AsyncTaskLoaderのあるActivityに戻ってきたときに再度loadInBackgroundが呼ばれる問題

最近はもっぱらAndroidのSupport LibraryでFragmentActivityな日々ですが、AsyncTaskLoaderが良いというウワサなのでAsyncTaskを置き換える程度の気持ちで使ったらガッツリハマりました。

今回の問題はAsyncTaskLoaderを実装したActivityから他のActivityに移動し、戻るボタンで戻ってきたときに勝手にloadInBackgroundが実行されてしまう問題です。

結論としては、何も考えずに以下サイトのdeliverResult以下全部自分のAsyncTaskLoaderにコピーしておけばいいです。

android – onLoadFinished not called after coming back from a HOME button press – Stack Overflow

一応転載しておきます。

public abstract class AsyncLoader<D> extends AsyncTaskLoader<D> {

    private D data;

    public AsyncLoader(Context context) {
        super(context);
    }

    @Override
    public void deliverResult(D data) {
        if (isReset()) {
            // An async query came in while the loader is stopped
            return;
        }

        this.data = data;

        super.deliverResult(data);
    }


    @Override
    protected void onStartLoading() {
        if (data != null) {
            deliverResult(data);
        }

        if (takeContentChanged() || data == null) {
            forceLoad();
        }
    }

    @Override
    protected void onStopLoading() {
         // Attempt to cancel the current load task if possible.
        cancelLoad();
    }

    @Override
    protected void onReset() {
        super.onReset();

        // Ensure the loader is stopped
        onStopLoading();

        data = null;
    }
}

この例では抽象クラスなので同じようなことをする場合はAsyncLoaderをextendsすればいいですね。

こちらも大体同じ構成のようです。

時代は AsyncTask より AsyncTaskLoader – ぐま あーかいぶ

呼び出しに時間のかかるサーバサイドのAPIの処理に利用しようとして、ActivityのonCreateで

getSupportLoaderManager().initLoader(0, null, mCallbacks);

として、呼び出しのたびに

        Bundle bundle = new Bundle(1);
        bundle.putString(KEY_PARAM_1, "something");
        getSupportLoaderManager().restartLoader(0, bundle, mCallbacks);

として呼び出していました。

戻るボタンで戻ってくると、これらを通らずにLoaderがonStartLoadingを実行するので、ここでforceLoadを実行していると、loadInBackgroundが実行されてしまいます。

まぁ、結局問題は条件をつけずに

    @Override
    protected void onStartLoading() {
        forceLoad();
    }

にしてしまっていたことなので、気をつけましょうという話です。

Loaderは概念もうちょっと理解しないと、危ないですね。


AndroidのIn-App BillingでIAB_PERMISSION_ERROR

公開鍵設定して、テストアカウントが登録してあるのを確認して、署名したapkをアップロードして、アプリ内課金を実行、しようとしたら以下のエラーに遭遇。

I/ActivityManager(96): Starting: Intent { act=android.intent.action.VIEW cmp=com.android.vending/com.google.android.finsky.activities.IabActivity (has extras) } from pid -1
D/Finsky(23209): [1] SelfUpdateScheduler.checkForSelfUpdate: Skipping self-update. Local Version [8014017] >= Server Version [0]
I/Mozc(167): RUN EMOJI PROVIDER DETECTION: null
I/ActivityManager(96): Displayed com.android.vending/com.google.android.finsky.activities.IabActivity: +284ms
W/Finsky(23209): [1] CarrierParamsAction.run: Saving carrier billing params failed.
E/Finsky(23209): [31] FileBasedKeyValueStore.delete: Attempt to delete '***' failed!
D/Finsky(23209): [1] GetBillingCountriesAction.run: Skip getting fresh list of billing countries.
E/Finsky(23209): [1] CarrierBillingUtils.isDcb30: CarrierBillingParameters are null, fallback to 2.0
E/Finsky(23209): [1] CheckoutPurchase.setError: type=IAB_PERMISSION_ERROR, code=12, message=null

結局、「1時間ほど待ったら解決してた」というオチ。


symfonyでlessを使えるようにするsfLESSPluginの使い方

Symfony 1.4で作ったWebサイトでbootstrapのカスタマイズをしたくなったのでlessのツールを探していたらsfLESSPluginという便利そうなものを見つけました。

Plugins | sfLESSPlugin | 1.1.0 | symfony | Web PHP Framework
https://github.com/everzet/sfLESSPlugin

lessファイルを置くだけでcssにコンパイルして表示できるプラグインです。

sfLessPhpPluginというものもあったようなのですが、sfLESSPluginになったようです。作者は同じです。

Plugins | sfLessPhpPlugin | 1.3.3 | symfony | Web PHP Framework

$ ./symfony plugin:install sfLESSPlugin

これでインストールはできるのですが、バージョン番号は同じもののgithubにあるファイルより古いので、githubから最新のファイルをインストールします。

ちなみに現時点で最新のコミットは以下ですが、PHP単体でlessをコンパイルできるlessphpが使えるようになっています。古いものはnode.jsが必要です。

https://github.com/everzet/sfLESSPlugin/commit/738e274ed131e9bdfad3bed7c2c4d031baf1511c

$ cd plugins/

$ git clone git://github.com/everzet/sfLESSPlugin.git
Cloning into sfLESSPlugin...
remote: Counting objects: 359, done.
remote: Compressing objects: 100% (176/176), done.
remote: Total 359 (delta 197), reused 317 (delta 161)
Receiving objects: 100% (359/359), 85.71 KiB | 131 KiB/s, done.
Resolving deltas: 100% (197/197), done.

$ cd ..

次にlessファイルを置くディレクトリを作ります。

$ mkdir web/less
$ cd web/less
$ wget https://github.com/twitter/bootstrap/zipball/v2.0.4 -O bootstrap.zip
$ unzip ./bootstrap.zip
$ mv ./twitter-bootstrap-41d3220/less/*.less ./
$ rm -R ./twitter-bootstrap-41d3220
$ rm ./bootstrap.zip
$ cd ../..

gitでダウンロードしたので、プラグインが自動的に有効になりません。

config/ProjectConfiguration.class.php

にenablePluginsを追加してプラグインを有効にします。

class ProjectConfiguration extends sfProjectConfiguration
{
  public function setup()
  {
    $this->enablePlugins('sfLESSPlugin');
    $this->enablePlugins('sfDoctrinePlugin');
  }
}

publish-assetsを実行してwebにプラグインのリンクを作ります。

$ ./symfony plugin:publish-assets

app/frontend/templates/layout.phpを編集します。

<?php use_helper('LESS'); ?>

を先頭に、

<?php include_less_stylesheets() ?>

を<?php include_stylesheets() ?>の代わりに指定します。

app/fronend/config/view.ymlにbootstrapのlessファイルを指定します。

stylesheets:    [bootstrap.less]

ちなみに、既存のcssも混在できます。

stylesheets:    [bootstrap.less, main.css]

その場合、cssファイルは今までどおり/cssから読み込まれます。

sfLESSPluginはブラウザサイドでlessファイルをless.jsで読み込んで解釈する方法と、サーバサイドでCSSとしてコンパイルしておく方法が使えます。

まずはブラウザサイドの動作を確認します。

ここまでで一度ブラウザで表示してみると、

/sfLESSPlugin/js/less-1.1.3.min.jsが404エラーになります。

plugins/sfLESSPlugin/web/jsを見ると、less-1.0.30.min.jsしか入っていないのでバージョンが違っています。

なぜかこのファイルは

plugins/sfLESSPlugin/lib/config/LESSConfig.class.php

でハードコーディングされています。

sfLESSのコンストラクタに独自のLESSConfigオブジェクトを渡せば変更できるようなのですが、それもハードコーディングされていたので諦めてLESSConfig.class.phpを書き換えてしまいます。

先にless.jsをダウンロードしてきます。

LESS « The Dynamic Stylesheet language

現時点では1.3.0が最新でした。

$ cd ./plugins/sfLESSPlugin/web/js/
$ wget http://lesscss.googlecode.com/files/less-1.3.0.min.js
$ cd ../../../../

plugins/sfLESSPlugin/lib/config/LESSConfig.class.php

を書き換えます。

  public function getLessJsPath()
  {
    // return '/sfLESSPlugin/js/less-1.1.3.min.js';
    return '/sfLESSPlugin/js/less-1.3.0.min.js';
  }

これでブラウザサイドでbootstrapをコンパイルする準備ができました。

ブラウザで確認すると、正常にbootstrapのCSSが効いていることがわかると思います。

このままではlessファイルを大量にリクエストすることになるので、次はサーバサイドでコンパイルして使うようにします。

ドキュメントにはnode.jsを使う方法が書いてありますが、せっかく新しいバージョンでlessphpが使えるようになったので、lessphpを試してみます。

まず、lessphpをダウンロードします。

lessphp – LESS compiler in PHP

$ cd ./lib/vendor
$ wget http://leafo.net/lessphp/src/lessphp-0.3.5.tar.gz
$ tar xvzf ./lessphp-0.3.5.tar.gz
$ mv ./lessphp/lessc.inc.php ./
$ rm -R ./lessphp
$ rm ./lessphp-0.3.5.tar.gz
$ cd ../..

必要なのはlessc.inc.phpだけです。また、ファイルはlib/vendor/lessc.inc.phpに置くように決められています。

で、また設定が

plugins/sfLESSPlugin/lib/config/LESSConfig.class.php

にあります。

  // protected $useLessphp = false;
  protected $useLessphp = true;

config/app.ymlに設定を書きます。less.jsを使用せず、コンパイルを有効にします。

  sf_less_plugin:
    compile:              true
    use_js:               false

これで設定は完了なのですが、このままだとcssファイルがweb/cssに書きだされます。

それはいいのですが、他のcssファイルもあるところに書き込まれるのはちょっと怖いので、階層を一段下げます。

$ cd ./web/less/
$ mkdir ./bootstrap
$ mv ./*.less ./bootstrap/
$ cd ../css/
$ mkdir ./bootstrap
$ chmod 777 ./bootstrap

app/fronend/config/view.ymlを修正します。

stylesheets:    [bootstrap/bootstrap.less, main.css]

これで完了です。

レスポンシブデザインを使いたい場合は、

stylesheets:    [bootstrap/bootstrap.less, bootstrap/responsive.less, main.css]

のようにresponsive.lessを追加してあげましょう。

ちなみに生成時にsymfonyのデバッグツールバーにlessのコンパイルにかかった時間が表示されるようになります。

image

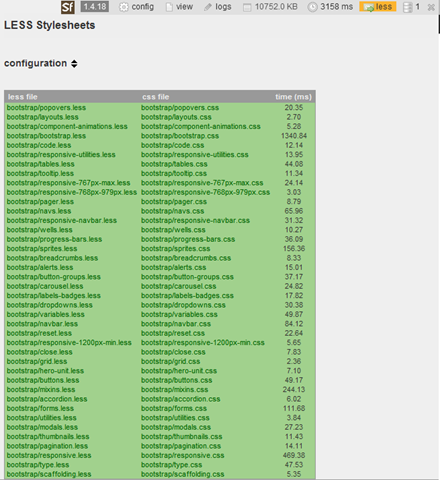
2回目以降は生成しませんが、更新の確認をするようなので、本番環境では外しておくことが推奨されています。

一度生成してしまえばあとは通常のCSSとして使えます。

config/app.ymlでprod環境を指定してcompileをfalseにします。

prod:
  sf_less_plugin:
    compile:              false
    use_js:               false

最後にタスクでの生成を確認します。

prod環境の場合はあらかじめタスクでコンパイルしてCSSにしておいたほうが便利だと思います。

初回のタスク実行前にccしておきます。

$ ./symfony cc
$ ./symfony less:compile --clean --compress

これで既存のLESSから書きだしたCSSファイルを削除して、新しく書きだされます。

一応、LESSに対応するCSSファイルしか削除しないようなので安心です。

これでcss/bootstrap/を777にしなくてよくなりますね。

–compressを付けることで容量が少し小さくなります。中身見たらこんな処理でした。

  static public function getCompressedCss($css)
  {
    return str_replace(array("\r\n", "\r", "\n", "\t", '  ', '    ', '    '), '', $css);
  }

あとは好きにbootstrapをカスタマイズできます。


HybridAuthでFacebookログインする際の権限について

HybridAuthの内部で、Facebookのscopeは

email, user_about_me, user_birthday, user_hometown, user_website, offline_access, read_stream, publish_stream, read_friendlists

がデフォルトに設定されています。scopeの設定を空にすると上記のパーミッションが使われるので、ログインに使いたいだけの場合、不要な許可をユーザーに求めることになります。

image

image

詳細なパーミッションの説明は
http://developers.facebook.com/docs/authentication/permissions/
に書かれています。

今回はFacebookをログインするためだけに使います。ここまでの情報は不要なので、Basic Information(基本データ)だけにします。基本的にはscopeを空にすれば良いはずです。

ところが、HybridAuthの内部で文字列をemptyで判断しているため、空にするとデフォルトに上書きされてしまいます。

if( isset( $this->config["scope"] ) && ! empty( $this->config["scope"] ) ){
	$this->scope = $this->config["scope"];
}

対策としては、scopeに空白をひとついれておけばOKです。

"scope"   => " ",

前回の「Symfony 1.4でHybridAuthを使ってtwitter/facebookログインを実装する」でymlにした場合は、

scope: " "

としておきます。

image

これで「このアプリが受け取る情報」の欄を減らすことができました。

ちなみに、一度許可したアプリをFacebook上から削除したい場合は

http://www.facebook.com/settings?tab=applications

から削除できます。

image


Symfony 1.4でHybridAuthを使ってtwitter/facebookログインを実装する

schema.ymlにUserモデルを以下のように作っておきます。

User:
  actAs: { Timestampable: ~ }
  tableName: users
  options:
    type: MyISAM
    collate: utf8_unicode_ci
    charset: utf8
    comment: 'ユーザー'
  columns:
    id:
      type: integer(4)
      unsigned: false
      primary: true
      autoincrement: true
      comment: 'ID'
    name:
      type: string(255)
      fixed: false
      notnull: true
      default: 'no name'
      comment: 'ユーザー名'
    image:
      type: blob
      notnull: false
      comment: 'アイコン画像'
    hybridauth_provider_name:
      type: string(20)
      fixed: false
      notnull: true
      comment: 'HybridAuthプロバイダ'
    hybridauth_provider_uid:
      type: string(255)
      fixed: false
      notnull: true
      comment: 'HybridAuthプロバイダUID'

HybridAuthをダウンロードします。

Download HybridAuth

ちなみにSymfony2用にはHybridAuthのバンドルがあります。1.4用にも欲しい…

$ cd lib/vendor
$ wget http://jaist.dl.sourceforge.net/project/hybridauth/hybridauth-2.0.11.zip
$ unzip ./hybridauth-2.0.11.zip
$ rm ./README.html
$ rm -R ./examples/
$ rm ./hybridauth-2.0.11.zip
$ cd ../..
$ mkdir lib/config

lib/configにsfEnvironmentYamlConfigHandler.class.phpを作成します。sfSimpleYamlConfigHandlerを継承して、環境設定が反映されるように変更します。

<?php

class sfEnvironmentYamlConfigHandler extends sfSimpleYamlConfigHandler
{
    public function execute($configFiles)
    {
        $config = self::getConfiguration($configFiles);
        
        // compile data
        $retval = "<?php\n".
                  "// auto-generated by %s\n".
                  "// date: %s\nreturn %s;\n";
        $retval = sprintf($retval, __CLASS__, date('Y/m/d H:i:s'), var_export($config, true));
        
        return $retval;
    }

    static public function getConfiguration(array $configFiles)
    {
        return self::replaceConstants(self::flattenConfigurationWithEnvironment(self::parseYamls($configFiles)));
    }
}

configにconfig_handlers.ymlを作成します。設定ファイルの処理の仕方をここで指定しています。

config/hybrid_auth.yml:
  class: sfEnvironmentYamlConfigHandler

で、同じくconfigにhybrid_auth.ymlファイルを作成します。

all:
  base_url: http://localhost/login/endpoint
  providers:
    OpenID:
      enabled: true

    Yahoo:
      enabled: true

    AOL:
      enabled: true

    Google:
      enabled: true
      keys:
        id: ""
        secret: ""
      scope: ""

    Facebook:
      enabled: true
      keys:
        id: ""
        secret: ""

      # A comma-separated list of permissions you want to request from the user.
      # See the Facebook docs for a full list of available permissions:
      # http://developers.facebook.com/docs/reference/api/permissions.
      scope: ""

      # The display context to show the authentication page.
      # Options are: page, popup, iframe, touch and wap.
      # Read the Facebook docs for more details:
      # http://developers.facebook.com/docs/reference/dialogs#display.
      # Default: page
      display: ""

    Twitter:
      enabled: true
      keys:
        key: ""
        secret: ""

    # windows live
    Live:
      enabled: true
      keys:
        id: ""
        secret: ""

    MySpace:
      enabled: true
      keys:
        key: ""
        secret: ""

    LinkedIn:
      enabled: true
      keys:
        key: ""
        secret: ""

    Foursquare:
      enabled: true
      keys:
        id: ""
        secret: ""

  # if you want to enable logging, set 'debug_mode' to true
  # then provide a writable file by the web server on "debug_file"
  debug_mode: false
  debug_file: ""

TwitterとFacebookのKeyとSecretにそれぞれOAuthのConsumer KeyとConsumer Secretを入れておきます。TwitterはCallback URLをダミーでも構わないので入れておかないといけないので注意。

Twitter https://dev.twitter.com/apps

Facebook https://developers.facebook.com/apps/

設定内容はHybridAuthのconfig.phpと内容的には同じものです。YAMLに書き換えたのと、devやprodなど環境ごとに設定を切り替えられるようになっています。デフォルトはall以下に書けばOKです。

lib/vendor以下はオートロードされないので、configにautoload.ymlファイルを作成します。

autoload:
  hybridauth:
    name:           hybridauth
    path:           %SF_LIB_DIR%/vendor/hybridauth
    recursive:      true

次にアクション側を実装します。

authモジュールを作ります。

$ ./symfony generate:module frontend auth

routing.ymlにログインとエンドポイントを追加します。

login_endpoint:
  url:   /login/endpoint
  param: { module: auth, action: endPoint }

login:
  url:   /login/:provider
  param: { module: auth, action: index }
  requirements:
    provider: Facebook|Google|Twitter

apps/frontend/lib/myUser.class.phpを編集してIDとユーザー名を保持できるようにします。

<?php

class myUser extends sfBasicSecurityUser
{

    const ATTRIBUTE_NAMESPACE = 'localhost/user/myUser/attributes';

    public function setName($name)
    {
        $this->setAttribute('name', $name, self::ATTRIBUTE_NAMESPACE);
    }

    public function getName()
    {
        return $this->getAttribute('name', null, self::ATTRIBUTE_NAMESPACE);
    }

    public function setId($id)
    {
        $this->setAttribute('id', $id, self::ATTRIBUTE_NAMESPACE);
    }

    public function getId()
    {
        return $this->getAttribute('id', null, self::ATTRIBUTE_NAMESPACE);
    }

    public function setImage($image)
    {
        $this->setAttribute('image', $image, self::ATTRIBUTE_NAMESPACE);
    }

    public function getImage()
    {
        return $this->getAttribute('image', null, self::ATTRIBUTE_NAMESPACE);
    }

    public function getImageBase64()
    {
        return base64_encode($this->getImage());
    }

}

lib/model/doctrine/UserTable.class.phpにプロバイダとUIDでユーザー名を検索するメソッドを実装します。

    public function getUserByProviderAndUid($providerName, $uid)
    {
        return $this->createQuery('u')
            ->where('u.hybridauth_provider_name = ?', $providerName)
            ->andWhere('u.hybridauth_provider_uid = ?', $uid)
            ->fetchOne();
    }

apps/frontend/modules/auth/actions/actions.class.phpを編集します。

<?php

class authActions extends sfActions
{

    public function executeIndex(sfWebRequest $request)
    {
        
        $config = sfContext::getInstance()->getConfigCache()->checkConfig(sfConfig::get('sf_config_dir').'/hybrid_auth.yml');
        
        try{
            $hybridauth = new Hybrid_Auth($config);
            
            $adapter = $hybridauth->authenticate($request->getParameter('provider'));
            
            $user_profile = $adapter->getUserProfile();
            
            $user = Doctrine::getTable('User')->getUserByProviderAndUid($adapter->id, $user_profile->identifier);
            
            if (!$user) {
                // 新規作成
                $user = new User();
                $user->set('name', $user_profile->displayName);
                $user->set('image', file_get_contents($user_profile->photoURL));
                $user->set('hybridauth_provider_name', $adapter->id);
                $user->set('hybridauth_provider_uid', $user_profile->identifier);
                $user->save();
            }
            
            $this->getUser()->setAuthenticated(true);
            $this->getUser()->setId($user->get('id'));
            $this->getUser()->setName($user->get('name'));
            $this->getUser()->setImage($user->get('image'));
            
            $this->redirect('@homepage');
            
        }
        catch( Exception $e ){  
            switch( $e->getCode() ){ 
            case 0 : echo "Unspecified error."; break;
            case 1 : echo "Hybriauth configuration error."; break;
            case 2 : echo "Provider not properly configured."; break;
            case 3 : echo "Unknown or disabled provider."; break;
            case 4 : echo "Missing provider application credentials."; break;
            case 5 : echo "Authentification failed. " 
            . "The user has canceled the authentication or the provider refused the connection."; 
            break;
            case 6 : echo "User profile request failed. Most likely the user is not connected "
            . "to the provider and he should authenticate again."; 
            $twitter->logout(); 
            break;
            case 7 : echo "User not connected to the provider."; 
            $twitter->logout(); 
            break;
            case 8 : echo "Provider does not support this feature."; break;
            } 
            
            // well, basically your should not display this to the end user, just give him a hint and move on..
            echo "<br /><br /><b>Original error message:</b> " . $e->getMessage();  
        }
        
        return sfView::NONE;
    }

    public function executeEndPoint(sfWebRequest $request)
    {
        Hybrid_Endpoint::process();
        
        return sfView::NONE;
    }

}

これでhttp://localhost/login/Twitterにアクセスすれば、Twitterの認証ページへジャンプしてログインができるようになります。

ログイン後のユーザー表示とかは、テンプレートでこんな感じに。

<img src="<?php echo 'data:;base64,' . $sf_user->getImageBase64(); ?>" alt="<?php echo $sf_user->getName(); ?>">&nbsp;
<?php echo $sf_user->getName(); ?>

後でどうせキャッシュしてしまうのでbase64_encodeのオーバーヘッドは無視です。


debianにRockMongoを入れる

MongoDBをブラウザのGUIで扱いたかったのですが、何やら管理ツールはたくさんあるみたいで、どれが良いのか正直わかりませんでした。

Admin UIs – MongoDB

とりあえず、コメント欄で盛り上がっていたRockMongoを試してみることにしました。

http://code.google.com/p/rock-php/wiki/rock_mongo_jp#ダウンロード

開発環境のdebian squeezeにRockMongoをインストールしてみました。aptで入るphpMyAdminと同じような構成にしてみることにします。どこのVirtualHostからでも/rockmongoでアクセスできる環境です。

MongoDBはあらかじめインストールしておいてください。

まずはRockMongoを/usr/shareに展開します。

# mkdir /usr/share/rockmongo
# cd /usr/share/rockmongo
# wget http://rockmongo.com/downloads/go?id=6 -O rockmongo-v1.1.2.zip
# unzip ./rockmongo-v1.1.2.zip
# rm ./rockmongo-v1.1.2.zip
# mv ./rockmongo/* .
# rm -R ./rockmongo/

Apache用の設定ファイルを作成します。

# vi /etc/apache2/conf.d/rockmongo.conf

phpMyAdminを参考に以下のようにしておきます。

Alias /rockmongo /usr/share/rockmongo

<Directory /usr/share/rockmongo>
        Options FollowSymLinks
        DirectoryIndex index.php

        <IfModule mod_php5.c>
                AddType application/x-httpd-php .php

                php_flag magic_quotes_gpc Off
                php_flag track_vars On
                php_flag register_globals Off
                php_value include_path .
        </IfModule>
#        <IfModule mod_authn_file.c>
#                AuthType Basic
#                AuthName "RockMongo"
#                AuthUserFile /path/to/.htpasswd
#                Require valid-user
#        </IfModule>

        php_value session.gc_maxlifetime 86400
</Directory>

認証とかIP制限とか付けたければ適当にやってください。

Apacheを再起動します。

# /etc/init.d/apache2 restart

で、ブラウザからサーバの/rockmongoにアクセスすればOKです。

image


AlertDialogのViewとの隙間を埋める

AndroidのAlertDialogを継承したクラスで、タイトルなし、setViewでダイアログいっぱいにViewを広げようとしたら、上下に隙間が開いてしまいました。

image

解決方法は簡単で、setView(View view)ではなく、setView(View view, int viewSpacingLeft, int viewSpacingTop, int viewSpacingRight, int viewSpacingBottom)を使うだけです。

image

コードのサンプルは以下のような感じです。

public class MyDialog extends AlertDialog {

    public MyDialog(Context context) {
        super(context);
    }

    @Override
    public void show() {

        LayoutInflater inflater = (LayoutInflater) this.getContext()
                .getSystemService(Context.LAYOUT_INFLATER_SERVICE);

        View layout = inflater.inflate(R.layout.my_dialog, null);

        GridView gridView = (GridView) layout.findViewById(R.id.gridView1);

        // this.setView(layout); // <- 上下に余白ができる
        this.setView(layout, 0, 0, 0, 0); // <- ぴったり埋まる

        super.show();

    }

}

ちなみに、AlertControllerの中ではこのように処理されています。

            customPanel = (FrameLayout) mWindow.findViewById(R.id.customPanel);
            FrameLayout custom = (FrameLayout) mWindow.findViewById(R.id.custom);
            custom.addView(mView, new LayoutParams(MATCH_PARENT, MATCH_PARENT));
            if (mViewSpacingSpecified) {
                custom.setPadding(mViewSpacingLeft, mViewSpacingTop, mViewSpacingRight,
                        mViewSpacingBottom);
            }
            if (mListView != null) {
                ((LinearLayout.LayoutParams) customPanel.getLayoutParams()).weight = 0;
            }

R.id.customはalert_dialog.xmlで定義されています。

    <FrameLayout android:id="@+id/customPanel"
        android:layout_width="match_parent"
        android:layout_height="wrap_content"
        android:layout_weight="1">
        <FrameLayout android:id="@+android:id/custom"
            android:layout_width="match_parent"
            android:layout_height="wrap_content"
            android:paddingTop="5dip"
            android:paddingBottom="5dip" />
    </FrameLayout>

上下5dip開いてますね。


androidでセパレーター画像を横幅いっぱいにする

長さが足りない素材で、セパレーターを画面の幅いっぱいに広げるテクニック。

下の画像は、上側のセパレーターが広げたもので、下のセパレーターが素材のままです。

image

layout.xml

<?xml version="1.0" encoding="utf-8"?>
<LinearLayout xmlns:android="http://schemas.android.com/apk/res/android"
    android:layout_width="match_parent"
    android:layout_height="match_parent"
    android:orientation="vertical" >

    <ImageView
        android:id="@+id/separator"
        android:layout_width="match_parent"
        android:layout_height="wrap_content"
        android:contentDescription="@string/separator"
        android:scaleType="fitXY"
        android:src="@drawable/separator_repeat" />

</LinearLayout>

separator_repeat.xml

<?xml version="1.0" encoding="utf-8"?>
<bitmap xmlns:android="http://schemas.android.com/apk/res/android"
    android:src="@drawable/separator"
    android:dither="true"
    android:tileMode="mirror" />

肝はbitmapのtileModeと、ImageViewのscaleTypeです。

tileMode="mirror"は左右を反転しながら繰り返し表示をしてくれるので、繋ぎ目が目立ちにくくなります。

scaleType="fitXY"は、指定しないとImageViewが画面いっぱいに広がっていても、画像は広がってくれません。指定すれば、タイル表示が有効になります。


node.js用のglob

PHP的にglobコマンドでファイル一覧を取得したかったので書いてみました。

var
  fs = require('fs');

fs.glob = function (path, pattern, callback) {
  fs.readdir(path, function (cb) {
    return function (err, files) {
      if (!err) {
        var files2 = [];
        for (var index in files) {
          if (files[index].match(pattern)) {
            files2.push(files[index]);
          }
        }
        cb(err, files2);
      }
      else {
        cb(err, files);
      }
    }
  } (callback));
};

fs.glob('.', /.*\.log/i, function (err, files) {
  console.log(files);
});

こんなんでいいのかな。一応動いているっぽいです。

[ 'npm-debug.log',
  'service.log',
  'test.20120621.log',
  'test.20120621090035.log',
  'test.20120621090058.log',
  'test1.log',
  'test1.old.log',
  'test2.log' ]


PythonのpsutilでUDPポート監視

Windows上で特定のUDPポートがオープンになっているかを確認するのにPythonのpsutilを使ってみました。psutilはWindowsでもLinuxでも同じように使えるので、移植も簡単です。

要はZabbix agentみたいなものを作りたかったのです。

netstatコマンドで同じことをしようとすると、言語ごとに表示内容が変わったりするのを自力で整形する必要があるので、一元的に管理できるのは助かります。

インストールは
easy_install psutil
だけでOKです。

psutil – A cross-platform process and system utilities module for Python – Google Project Hosting

公式サイトを見てもらえばわかるのですが、psutilは本当に強力で、CPUの使用率からメモリ、ディスクスペース、ネットワークインターフェイスの状態、プロセスの優先度設定、停止、再開など色々なことが簡単にできます。

以下はPyDHCPLibで動いているプログラムがUDP67番ポートをListenしているかを確認するコードです。

import psutil
import re
found = False
iter = psutil.process_iter()
for p in iter:
    if re.search("python", p.name) != None:
        connections = p.get_connections(kind='udp4')
        for con in connections:
            if con.local_address == ('0.0.0.0', 67):
                found = True
                print p
                break
    if (found):
        break

あと、オフライン環境のマシンにもインストールさせたいのでeggファイルを用意します。eggファイルの形式では公開されていないので、easy_installでインストールしたものをコピーしてきます。eggファイルはpython\Lib\site-packages\psutil-0.4.1-py2.7-win32.eggにあります。

pydファイルも含まれているので、ファイルひとつだけコピーしてきて、

easy_install psutil-0.4.1-py2.7-win32.egg

でインストールできます。