前回オプションメニューの文字色とフォントを変更するエントリを書きましたが、アイコンの隣に文字を表示したい要件が出てきました。
前回
OptionsMenuの文字色を変更する : blog.loadlimit – digital matter –
で、色々やってみましたが、手詰まりしてしまいました。やっぱりアイコンと文字をセットにした画像を用意してしまって、文字は消してしまう方が確実です。
惜しいところまで行った現状の記録を残しておきます。
なんですかね、心が離れてしまったんですかね。
ソース
public class CustomizedMenuActivity extends Activity {
public static final int MENU_ID_COFFEE = 1;
public static final int MENU_ID_LOVE = 2;
public static final int MENU_ID_RECYCLE = 3;
@Override
public void onCreate(Bundle savedInstanceState) {
super.onCreate(savedInstanceState);
setContentView(R.layout.customized_menu);
}
protected TextView getMenuItemView(MenuItem item) {
try {
Class<?> c = item.getClass(); // MenuItemImplのインスタンス
Class<?>[] paramTypesGetItemView = { int.class, ViewGroup.class };
Method method;
method = c.getDeclaredMethod("getItemView", paramTypesGetItemView);
// getItemViewはprivateメソッドなのでアクセス可能に変更する
method.setAccessible(true);
// IconMenuItemViewを取得できる
TextView view = (TextView) method.invoke(item, new Object[] { 0,
null });
return view;
} catch (SecurityException e) {
e.printStackTrace();
} catch (NoSuchMethodException e) {
e.printStackTrace();
} catch (IllegalArgumentException e) {
e.printStackTrace();
} catch (IllegalAccessException e) {
e.printStackTrace();
} catch (InvocationTargetException e) {
e.printStackTrace();
}
return null;
}
@Override
public boolean onCreateOptionsMenu(Menu menu) {
// メニューアイテムの追加
MenuItem menuItemCoffee = menu.add(Menu.NONE, MENU_ID_COFFEE,
Menu.NONE, this.getText(R.string.menu_coffee)).setIcon(
R.drawable.icon_coffee);
MenuItem menuItemLove = menu.add(Menu.NONE, MENU_ID_LOVE, Menu.NONE,
this.getText(R.string.menu_love)).setIcon(R.drawable.icon_love);
MenuItem menuItemRecycle = menu.add(Menu.NONE, MENU_ID_RECYCLE,
Menu.NONE, this.getText(R.string.menu_recycle)).setIcon(
R.drawable.icon_recycle);
try {
TextView viewCoffee = getMenuItemView(menuItemCoffee);
TextView viewLove = getMenuItemView(menuItemLove);
TextView viewRecycle = getMenuItemView(menuItemRecycle);
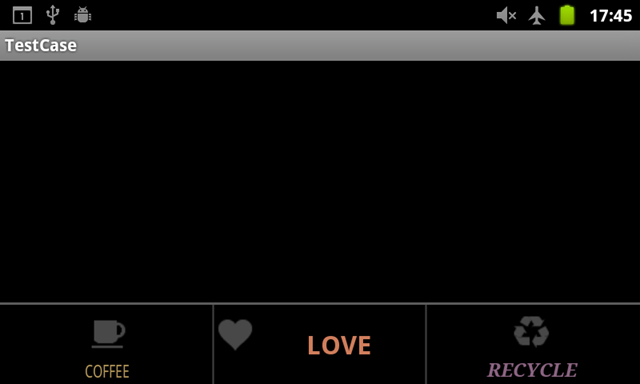
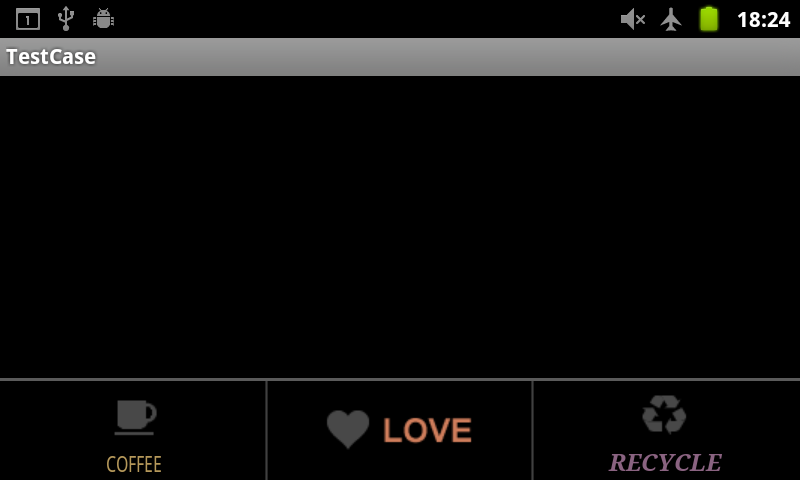
// テキストの色を変える
viewCoffee.setTextColor(0xFFB5985A);
viewCoffee.setTextSize(14);
viewCoffee.setTextScaleX(0.8f);
viewLove.setTextColor(0xFFCF7D5B);
viewLove.setTextSize(22);
viewLove.setTypeface(Typeface.DEFAULT_BOLD);
viewRecycle.setTextColor(0xFF8A6381);
viewRecycle.setTextSize(16);
viewRecycle.setTypeface(Typeface.create(Typeface.SERIF,
Typeface.BOLD_ITALIC));
// アイコン画像を取得
Field field = viewLove.getClass().getDeclaredField("mIcon");
field.setAccessible(true);
Drawable icon = (Drawable) field.get(viewLove);
// アイコンの描画領域を取得
// Rect iconRect = icon.getBounds();
// iconRect.left += 50;
// iconRect.right += 50;
// icon.setBounds(iconRect); // ※IconMenuItemViewクラスのonLayoutで上書きされてしまう
// アイコンを文字の左側に表示する
viewLove.setCompoundDrawables(icon, null, null, null);
// 文字の配置を中央寄せにする
viewLove.setGravity(Gravity.CENTER_VERTICAL
| Gravity.CENTER_HORIZONTAL);
} catch (NoSuchFieldException e) {
e.printStackTrace();
} catch (SecurityException e) {
e.printStackTrace();
} catch (IllegalArgumentException e) {
e.printStackTrace();
} catch (IllegalAccessException e) {
e.printStackTrace();
}
return super.onCreateOptionsMenu(menu);
}
}
問題はIconMenuItemViewクラスでpositionIconメソッドがアイコンの位置を決定しているのですが、onLayoutのタイミングで呼び出されるので、上書きされてしまうようなのですね。
ActivityのViewでonLayoutをオーバーライドして、うまくいけばアイコンが描画される前に位置変更差し込めるのかなぁ?
ちょっともう面倒なので画像にしてしまいます。


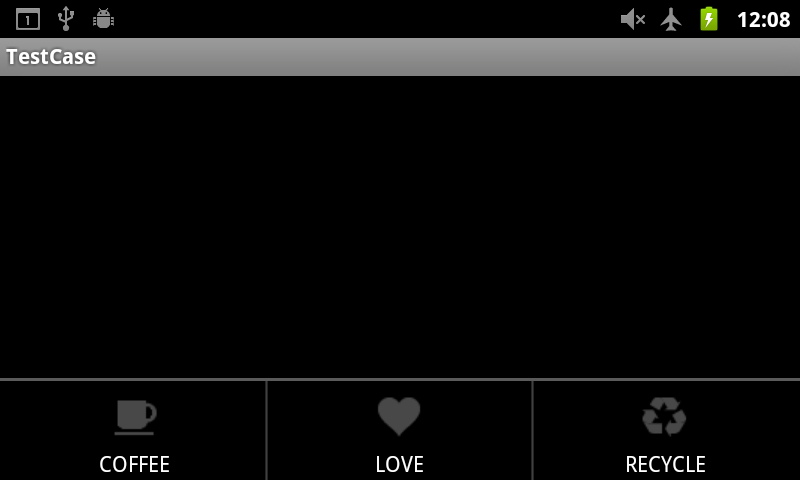
あ、いいですね。まずは画像登録とテキストを空に。
		MenuItem menuItemLove = menu.add(Menu.NONE, MENU_ID_LOVE, Menu.NONE,
				null).setIcon(R.drawable.icon_love2);
文字の分の空白が下に空いてしまうので、文字サイズを1にしておきます。0は効かないようです。
これで一応できました。
MenuView.ItemViewを実装すればこんな事しなくてもViewをまるごとカスタマイズできるのかな…
ちょっともう少し調べてみます。
Menu::add→Menu::addInternal→new MenuItemImpl
で、MenuItemImplのgetItemViewを呼び出したタイミングでMenuItemImpl::createItemViewが呼び出されます。
    private MenuView.ItemView createItemView(int menuType, ViewGroup parent) {
        // Create the MenuView
        MenuView.ItemView itemView = (MenuView.ItemView) getLayoutInflater(menuType)
                .inflate(MenuBuilder.ITEM_LAYOUT_RES_FOR_TYPE[menuType], parent, false);
        itemView.initialize(this, menuType);
        return itemView;
    }
getLayoutInflaterは同じクラスのメソッド。
    public LayoutInflater getLayoutInflater(int menuType) {
        return mMenu.getMenuType(menuType).getInflater();
    }
リフレクションで呼んで何が返ってくるのか見て見ました。menuTypeはアイコンメニューなので0。
			Class<?>[] param = {int.class};
			method = c.getDeclaredMethod("getLayoutInflater", param);
			LayoutInflater mLayoutInflater = (LayoutInflater) method.invoke(item, new Object[] { 0 });
			Log.d(TAG, "" + mLayoutInflater.getClass().getName());
↓
com.android.internal.policy.impl.PhoneLayoutInflater
public class PhoneLayoutInflater extends LayoutInflater
えー…
PhoneLayoutInflaterでinflateメソッドはオーバーライドされていないので、LayoutInflaterのinflateを見る。呼ばれたのはこれかな。
    public View inflate(int resource, ViewGroup root, boolean attachToRoot) {
        if (DEBUG) System.out.println("INFLATING from resource: " + resource);
        XmlResourceParser parser = getContext().getResources().getLayout(resource);
        try {
            return inflate(parser, root, attachToRoot);
        } finally {
            parser.close();
        }
    }
resourceは、com.android.internal.R.layout.icon_menu_item_layoutですね。
frameworks/base/core/res/res/layout/icon_menu_item_layout.xml
<com.android.internal.view.menu.IconMenuItemView xmlns:android="http://schemas.android.com/apk/res/android"
    android:id="@+id/title"
    android:layout_width="match_parent"
    android:layout_height="match_parent"
    android:paddingBottom="1dip"
    android:paddingLeft="3dip"
    android:paddingRight="3dip"
    android:singleLine="true"
    android:ellipsize="marquee"
    android:fadingEdge="horizontal" />
あー、ここにあったのか。
割り込める可能性があるとすれば、MenuItemImplクラスのgetItemViewメソッド。
    View getItemView(int menuType, ViewGroup parent) {
        if (!hasItemView(menuType)) {
            mItemViews[menuType] = new WeakReference<ItemView>(createItemView(menuType, parent));
        }

        return (View) mItemViews[menuType].get();
    }
つまり、mItemViewsにリフレクションで先にViewを入れておけばいいってことですかね。
うーん…


 HOMMA Teppei

