‘Programming’ カテゴリーのアーカイブ

Androidで地磁気センサーの値が取れない問題

いや、取れないわけじゃないですけどね。SensorManager.SENSOR_STATUS_UNRELIABLEにハマった…

駄猫の備忘録: 久々にセンサーを使ってみた

XPERIA rayで方位が取れない問題があったので、調べていたところaccuracyのチェックでメソッドを抜けていたことが判明…完全に見落としてた。

	@Override
	public void onSensorChanged(SensorEvent event) {

		if (event.accuracy == SensorManager.SENSOR_STATUS_UNRELIABLE) {
			return;
		}

		switch (event.sensor.getType()) {
		case Sensor.TYPE_MAGNETIC_FIELD:
			magneticValues = event.values.clone(); // ■ここに来ない
			break;
		case Sensor.TYPE_ACCELEROMETER:
			accelerometerValues = event.values.clone();
			break;
		}

		// do something ...

	}

GALAXY Sでも方向が取れないと報告があったので多分これでしょう。

キャリブレーションすればいいのかな…


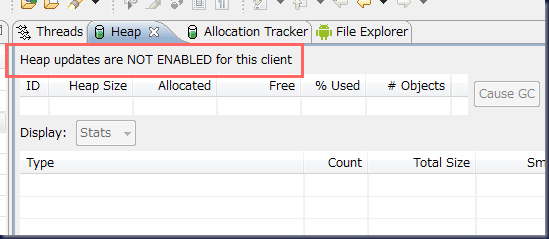
Heap updates are NOT ENABLED for this client

How to enable Heap updates on my android client – Stack Overflow

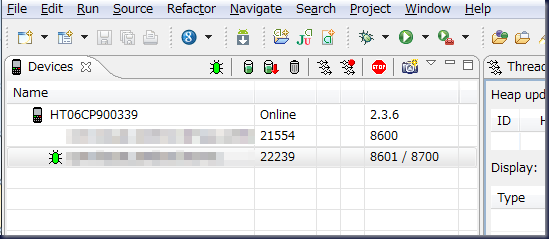
EclipseのDDMSでAndroid実機端末のヒープを見る方法のメモ。

heap1

heap2

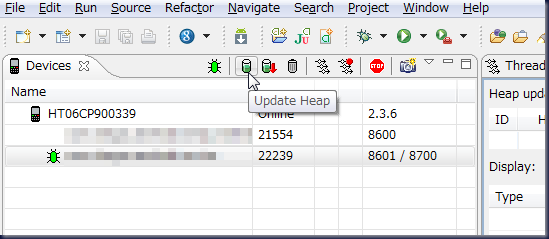
デバイスビューの緑の筒みたいなアイコンをクリックします。

heap3

これでヒープが見られるようになります。

heap4


CoreException: Could not calculate build plan: Plugin org.apache.maven.plugins:maven-resource-plugin:2.4.3

Eclipse 3.7(Indigo)で、m2eをインストールしてTwitter4jをインポートしたあと、pom.xmlで

CoreException: Could not calculate build plan: Plugin org.apache.maven.plugins:maven-resource-plugin:2.4.3

というエラーが表示されてビルドできないという現象がありました。

m2eの再インストールとか色々試したのですが、以下の情報で解決できました。

De GIS, Programación y Otros Demonios: Maven Error: Could not calculate build plan

Windowsのユーザーフォルダにある.m2\repositoryフォルダの中から、「.lastUpdated」という拡張子がついたファイルを検索します。

ファイルが見つかったら、それを削除します。

Eclipseのプロジェクトエクスプローラー上から、プロジェクトを選択して、右クリック、Maven→Update Project Configuration…を選択、プロジェクトを選択してOKを押すだけです。


MavenのプロジェクトをEclipseにインポートする

環境はWindows7+Eclipse 3.7(Indigo)。

以前、m2eclipseと呼ばれていたプロジェクトは正式にEclipseのプロジェクトに取り込まれて、今はm2eとしてEclipseのレポジトリからインストールできます。

Webで検索すると、sonatypeのサイトにリンクしている、情報が古いエントリが多く出てくるので注意。

メニューのHelp→Install New Software…で、Work withに「Indigo – http://download.eclipse.org/releases/indigo」を選択。

「type filter text」の欄に「maven」と入力すれば「m2e」が表示されます。「m2e – Maven Integration for Eclipse    1.0.0.20110607-2117」にチェックを入れて、先に進めばインストールできます。

実際にMavenのプロジェクトを取り込むときは、メニューのFile→Import→Maven→Existing Maven Projectsを選択して、「Root Directory」の欄にpom.xmlのあるディレクトリを指定すればProjectsのリストが表示されます。


Symfonyの機能テストでclickを使わずにmultipartのファイルPOSTをする方法

Symfony 1.4で実装したAPIのFunctionalテストをする際に、ファイルをPOSTする方法に迷ったので調べました。

ファイルのアップロードテストは、通常のWebサイトであれば、

$browser->
    get('/upload')->
    click('Upload', array('form' => array(
        'file1' => sfConfig::get('sf_test_dir').'/datas/test01.jpg',
    )))
;

みたいに書くのですが、テストしたいアプリケーションはAPIなので、GETするページはありません。

sfBrowserBase::clickを参考にして、こんな感じで実装しました。

まずはテスト本体。test/functional/api/hogeActionsTest.php

<?php

include(dirname(__FILE__).'/../../bootstrap/functional.php');

$browser = new MyTestFunctional(new myBrowser());
$browser->loadData();

$browser->
    info('JPEGファイルをアップロードできる')->
    setUploadFile('file1', sfConfig::get('sf_test_dir').'/datas/test01.jpg')->
    post('/upload', array('title' => 'hoge'))->
    
    with('response')->begin()->
        isStatusCode(200)->
    end()->
;

次にmyBrowserを定義します。lib/test/myBrowser.class.php

<?php

class myBrowser extends sfBrowser
{

    public function setUploadFile($key, $filename)
    {
        if (is_readable($filename))
        {
          $fileError = UPLOAD_ERR_OK;
          $fileSize = filesize($filename);
        }
        else
        {
          $fileError = UPLOAD_ERR_NO_FILE;
          $fileSize = 0;
        }
        
        $this->parseArgumentAsArray($key, array(
            'name' => basename($filename),
            'type' => '',
            'tmp_name' => $filename,
            'error' => $fileError,
            'size' => $fileSize,
        ),
        $this->files);
    }

}

sfBrowserBaseクラスのfilesに対して配列でファイルの情報を書き込むと、POST直前に$_FILESに書きこんでくれます。

で、あとはMyでmyBrowser::setUploadFileを呼び出すだけです。lib/test/MyTestFunctional.class.php

<?php

class MyTestFunctional extends sfTestFunctional
{
    public function loadData()
    {
        $doctrine = Doctrine_Manager::getInstance()->getCurrentConnection()->getDbh();
        $doctrine->query('SET FOREIGN_KEY_CHECKS = 0');
        $doctrine->query('TRUNCATE TABLE uploads');
        $doctrine->query('SET FOREIGN_KEY_CHECKS = 1');
        unset($doctrine);
        
        Doctrine::loadData(sfConfig::get('sf_test_dir').'/fixtures/');
        return $this;
    }

    public function setUploadFile($key, $filename)
    {
        $this->browser->setUploadFile($key, $filename);
        
        return $this;
    }
}

こうやってsetUploadFile(…)->post(…)と呼び出せばOKです。

sfBrowserBase::callされるたびにfilesの中身はクリアされます。


AndroidアプリからFacebookアプリに画像をキャプション付きで投稿する

Androidにて、ActivityからFacebookにギャラリーの画像をシェアする際に、画像の説明であるキャプションを指定する方法がわからなかったので調べました。

結論としてはIntent.EXTRA_TITLEを指定すれば良いようです。

TwitterやメールではIntent.EXTRA_TEXTとかなので、そのままだとFacebookアプリには反映されません。

String text = "Some caption...";
Uri path = Uri.parse("content://media/external/images/media/1"); // Gallery's URI etc.

Intent intent = new Intent(Intent.ACTION_SEND);

// キャプション
intent.putExtra(Intent.EXTRA_TITLE, text);

// 添付ファイル
intent.setType("image/jpeg");
intent.putExtra(Intent.EXTRA_STREAM, path);

intent.setFlags(Intent.FLAG_ACTIVITY_NEW_TASK);
startActivity(Intent.createChooser(intent, getString(R.string.post_facebook)));

追記 2012/09/20

Facebookのプラットフォームにより、Intentでテキストを追加することができなくなったそうです。
Bug – Android Intent Sharing is Broken – Facebook開発者


sfFlickrPluginのRequest failed.に対処する

symfony 1.4にて、Flickrから画像を取得して使いたかったので、sfFlickrPluginを使ってみました。

sfFlickrPluginのインストール方法はこちらのサイトを参考にチェックアウトできます。

symfonyでFlickrを使用するためのPluginまとめ – Layer8 Reference

基本的には手動によるセットアップです。
plugins/に展開します。
自分はエクスポートしました。

$ cd plugins/
$ svn export http://svn.symfony-project.com/plugins/sfFlickrPlugin

キーに関してはさきほどのサイトを参考に。

あとは

config/ProjectConfiguration.class.php

に、enablePluginsを追加すればOKです。

  public function setup()
  {
    $this->enablePlugins('sfDoctrinePlugin');
    $this->enablePlugins('sfFlickrPlugin');
  }

で、セットアップ完了。

ここから表題の話。

グループから写真を取得したい場合はgetGroupPhotoListを使います。

が、getGroupPhotoListを実行すると、

Request failed. The requested URL returned error: 413

というエラーで停止。

plugins/sfFlickrPlugin/lib/vendor/Phlickrを最新に差し替えることで解決します。

Phlickrはこちらにあります。

Phlickr | Download Phlickr software for free at SourceForge.net

Phlickrの最新版は0.2.8だったので、丸ごと上書きします。

ファイル一式とFramework、TextUiディレクトリも上書き

それ以外のディレクトリは調べてないのでわからないですが、まぁ、置いておけば良いのでは。

Testsは、いらない雰囲気。

これで正常に動くようになりました。

あと、桁あふれの問題があるので、

PhlickrのbuildImgUrlでPhoto IDが桁あふれ : blog.loadlimit – digital matter –

を参考にして修正してください。


mod_rewriteでブラウザの言語別にリダイレクトする

ユーザーがサイトのあるページ(http://sample.com/hoge/)に来た際に、ブラウザの優先言語が日本語の場合はjaページ(http://sample.com/hoge/ja/)、英語やそれ以外の言語の場合はenページ(http://sample.com/hoge/en/)に飛ばす方法のメモ。

やり方は以下のサイトから。

Redirect according to browser language: mod rewrite and HTTP_ACCEPT_LANGUAGE | Michal Borychowski

本来は

RewriteCond %{HTTP_ACCEPT_LANGUAGE}

とか書きたいところを、この変数がApacheに存在しないので、

RewriteCond %{HTTP:Accept-Language}

にするのが肝らしいです。

で、書いてみた.htaccessファイルはこちら。

<IfModule mod_rewrite.c>
  RewriteEngine On

  RewriteCond %{HTTP:Accept-Language} ^ja [NC]
  RewriteRule ^$ /hoge/ja/ [L,R=301]

  RewriteRule ^$ /hoge/en/ [L,R=301]
</IfModule>

FireFox,IE,Chromeで問題なさそうだったのでOK。


Androidのライブ壁紙をActivityから指定したい

アプリの一覧からアイコンを押したら、ライブ壁紙をプレビュー→壁紙に設定できる状態にできないかという話題。

ちなみに結論としてはパーミッション不足により失敗です。

ライブ壁紙の選択画面を表示させることはできるので、
Live Wallpaper – Binding an Activity to the ‘Open’ button of the market
こちらを参考にライブ壁紙選択画面の上にカスタムビューなどを表示させて誘導させるのが次善の策かと思います。

ライブ壁紙選択画面を表示するだけなら

Intent intent = new Intent(); 
intent.setAction(WallpaperManager.ACTION_LIVE_WALLPAPER_CHOOSER); 
startActivity(intent); 

でOK。

以下は失敗の記録。

上で書いたライブ壁紙選択画面表示のコードは 
LiveWallpaperをアプリから設定する方法を探ってみた|いろいろ備忘録

こちらの方法でも代替できます。

LiveWallpaperListActivityのソースコードを持ってきて追いかけてみることにしました。

LiveWallpaperListActivity.java

これを同じパッケージ内に設置して、layoutやdimen、color等を適当に用意してやることで、選択画面は同じ物を再現できます。

一応、用意したファイル

live_wallpaper_list.xml

<?xml version="1.0" encoding="utf-8"?> 
<LinearLayout xmlns:android="http://schemas.android.com/apk/res/android" android:layout_width="fill_parent" android:layout_height="wrap_content" android:paddingLeft="6dip" android:paddingRight="6dip" android:paddingTop="6dip" android:paddingBottom="6dip" android:minHeight="?android:attr/listPreferredItemHeight"> 
<ListView android:id="@android:id/list" android:layout_width="fill_parent" android:layout_height="fill_parent" android:drawSelectorOnTop="false"/> 
<TextView android:id="@android:id/empty" android:layout_width="fill_parent" android:layout_height="fill_parent" android:gravity="center" android:visibility="gone" android:text="@string/live_wallpaper_empty" android:textAppearance="?android:attr/textAppearanceMedium"/> 
</LinearLayout>

live_wallpaper_entry.xml

<?xml version="1.0" encoding="utf-8"?> 
<RelativeLayout xmlns:android="http://schemas.android.com/apk/res/android" android:layout_width="fill_parent" android:layout_height="wrap_content" android:paddingLeft="6dip" android:paddingRight="6dip" android:paddingTop="6dip" android:paddingBottom="6dip" android:minHeight="?android:attr/listPreferredItemHeight"> 
<ImageView android:id="@+id/thumbnail" android:layout_width="@dimen/live_wallpaper_thumbnail_width" android:layout_height="@dimen/live_wallpaper_thumbnail_width" android:layout_gravity="center_vertical" android:scaleType="centerCrop"/> 
<LinearLayout android:layout_width="wrap_content" android:layout_height="wrap_content" android:layout_marginLeft="10dip" android:layout_marginRight="8dip" android:layout_centerVertical="true" android:layout_toRightOf="@id/thumbnail" android:orientation="vertical"> 
<TextView android:id="@+id/title_author" android:layout_width="fill_parent" android:layout_height="wrap_content" android:textAppearance="?android:attr/textAppearanceMedium" android:singleLine="true" android:ellipsize="marquee"/> 
<TextView android:id="@+id/description" android:layout_width="fill_parent" android:layout_height="wrap_content" android:textAppearance="?android:attr/textAppearanceSmall" android:maxLines="3"/> 
</LinearLayout> 
</RelativeLayout>

color.xml

<?xml version="1.0" encoding="utf-8"?> 
<resources> 
    <color name="live_wallpaper_thumbnail_background">#000000</color> 
    <color name="live_wallpaper_thumbnail_text_color">#ffffff</color> 
</resources>

dimens.xml (値は適当にいれた)

<?xml version="1.0" encoding="utf-8"?> 
<resources> 
    <dimen name="live_wallpaper_thumbnail_width">50dp</dimen> 
    <dimen name="live_wallpaper_thumbnail_height">50dp</dimen> 
    <dimen name="live_wallpaper_thumbnail_text_size">50dp</dimen> 
    <dimen name="live_wallpaper_thumbnail_text_offset">50dp</dimen> 
</resources>

で、このままでは

LiveWallpaperPreview.showPreview(this , REQUEST_PREVIEW, intent, info);

の行がコンパイルできないのでshowPreviewメソッド(staticメソッド)だけを取り出してきてLiveWallpaperListActivityに

	static final String EXTRA_LIVE_WALLPAPER_INTENT = "android.live_wallpaper.intent";
	static final String EXTRA_LIVE_WALLPAPER_SETTINGS = "android.live_wallpaper.settings";
	static final String EXTRA_LIVE_WALLPAPER_PACKAGE = "android.live_wallpaper.package";

	public void onItemClick(AdapterView<?> parent, View view, int position,
			long id) {
		final Intent intent = mWallpaperIntents.get(position);
		final WallpaperInfo info = mWallpaperInfos.get(position);
		//LiveWallpaperPreview.showPreview(this, REQUEST_PREVIEW, intent, info);
		//Intent preview = new Intent(this, LiveWallpaperPreview.class);
		String clazz = "com.android.wallpaper.livepicker.LiveWallpaperPreview";
		Intent preview = new Intent(Intent.ACTION_MAIN);
		int idx = clazz.lastIndexOf('.');
		String pkg = clazz.substring(0, idx);
		preview.setClassName(pkg, clazz);
		preview.setFlags(Intent.FLAG_ACTIVITY_NEW_TASK);
		preview.putExtra(EXTRA_LIVE_WALLPAPER_INTENT, intent);
		preview.putExtra(EXTRA_LIVE_WALLPAPER_SETTINGS,
				info.getSettingsActivity());
		preview.putExtra(EXTRA_LIVE_WALLPAPER_PACKAGE, info.getPackageName());
		this.startActivityForResult(preview, REQUEST_PREVIEW);
	}

先程のサイトを参考に、こんな感じで書き換え。で、実行。

FATAL EXCEPTION: main 
java.lang.SecurityException: Permission Denial: starting Intent { act=android.intent.action.MAIN flg=0x10000000 cmp=com.android.wallpaper.livepicker/.LiveWallpaperPreview (has extras) } from ProcessRecord{4073a338 8432:com.sample.android.TestCase/10077} (pid=8432, uid=10077) requires null 
    at android.os.Parcel.readException(Parcel.java:1322) 
    at android.os.Parcel.readException(Parcel.java:1276) 
    at android.app.ActivityManagerProxy.startActivity(ActivityManagerNative.java:1351) 
    at android.app.Instrumentation.execStartActivity(Instrumentation.java:1374) 
    at android.app.Activity.startActivityForResult(Activity.java:2827) 
    at com.sample.android.TestCase.LiveWallpaperListActivity.onItemClick(LiveWallpaperListActivity.java:201) 
    at android.widget.AdapterView.performItemClick(AdapterView.java:284) 
    at android.widget.ListView.performItemClick(ListView.java:3513) 
    at android.widget.AbsListView$PerformClick.run(AbsListView.java:1812) 
    at android.os.Handler.handleCallback(Handler.java:587) 
    at android.os.Handler.dispatchMessage(Handler.java:92) 
    at android.os.Looper.loop(Looper.java:130) 
    at android.app.ActivityThread.main(ActivityThread.java:3683) 
    at java.lang.reflect.Method.invokeNative(Native Method) 
    at java.lang.reflect.Method.invoke(Method.java:507) 
    at com.android.internal.os.ZygoteInit$MethodAndArgsCaller.run(ZygoteInit.java:839) 
    at com.android.internal.os.ZygoteInit.main(ZygoteInit.java:597) 
    at dalvik.system.NativeStart.main(Native Method)

とりあえずライブ壁紙の一覧とアイコンは取れるってことはわかりましたね…


Twitter+oauth-signpostでOAuthCommunicationException?

oauth.signpost.exception.OAuthCommunicationException: Communication with the service provider failed: https://api.twitter.com/oauth/request_token

Application TypeをBrowserにして、Callback URLをダミーでいいので入力したかい?入力しないとClientに変更されるよ。

Request token URL

https://api.twitter.com/oauth/request_token

Access token URL

https://api.twitter.com/oauth/access_token

Authorize URL

https://api.twitter.com/oauth/authorize

httpsになってるからちゃんとdev.twitter.comから新しいのコピペしようね。

っていう、自分への備忘録。Androidの話。