Eclipse Keplerで、ADT Translation Manager Pluginをインストールしたら、Eclipseの設定が消えたようになってworkspace含め初期状態で起動するようになってしまいました。
Installing the Eclipse Plugin | Android Developers
結局根本的な解決には至りませんでしたが、上記プラグインをアンインストールしたら復旧したので解決です。
2013/12/10
Eclipse Keplerで、ADT Translation Manager Pluginをインストールしたら、Eclipseの設定が消えたようになってworkspace含め初期状態で起動するようになってしまいました。
Installing the Eclipse Plugin | Android Developers
結局根本的な解決には至りませんでしたが、上記プラグインをアンインストールしたら復旧したので解決です。
2013/05/24
ADT22にして既存のプロジェクトを実行してみようと思ったら「Multiple dex files define」というエラーがコンソールに出て、実行できない状態になりました。
[2013-05-24 17:07:13 - Dex Loader] Unable to execute dex: Multiple dex files define Loauth/signpost/commonshttp/CommonsHttpOAuthConsumer;
[2013-05-24 17:07:13 - ***] Conversion to Dalvik format failed: Unable to execute dex: Multiple dex files define Loauth/signpost/commonshttp/CommonsHttpOAuthConsumer;
これは同じクラス名を持つ複数のjarがAPKに含まれている場合に出るエラーです。
ADT22でプロジェクトにAndroid Private Librariesというフォルダができていて、apkにexportするファイルが被るから、という理由のようです。
解決方法は、Eclipseのプロジェクトを右クリックして、「Build Path」→「Configure Build Path」→「Order and Export」タブで、「Android Private Libraries」にチェックが入っていることを確認して、またlibs以下のファイルにチェックが「入っていないこと」を確認します。
このエラーが出たときは、signpostのライブラリにチェックが入っていたので、外しました。
2013/01/06
最近のADTはかなり便利で、いちいちcygwinだのndk-buildだのを呼ばなくても直接Eclipseの中からビルドができるようになっています。
ただ、僕の環境がアップデートを繰り返していたからなのか、Window→Preferences→AndroidにNDKの項目がありませんでした。ADTは21で最新になっているのに。
結局これはADTとAndroid Native Development Toolsを両方一旦削除して再インストールすることで直りました。
ところが、プロジェクトを開いた瞬間にEclipseがJavaVMごと落ちて、以降起動しない現象に陥りました。
どうもCDTのせいらしいです。
# JRE version: 6.0_24-b07
# Java VM: Java HotSpot(TM) 64-Bit Server VM (19.1-b02 mixed mode windows-amd64 compressed oops)
# Problematic frame:
# j  org.eclipse.cdt.internal.core.dom.parser.cpp.semantics.CPPSemantics.expandUsingDeclarationsAndRemoveObjects([Lorg/eclipse/cdt/core/dom/ast/IBinding;Lorg/eclipse/cdt/internal/core/dom/parser/cpp/semantics/LookupData;)[Lorg/eclipse/cdt/core/dom/ast/IBinding;+0
eclipse.iniに
-XX:-UseCompressedOops
を追加すると良いと書いてあったのを見つけて、末尾に追加したら解決しました。
UseCompressedOopsのオプションについては以下のサイトが詳しいです。
2012/10/05
EclipseでMercurialEclipseを使っているのですが、Junoにアップデートしてから事あるごとにポップアップでエラーが表示されて困っていました。
ヒストリーを表示したときや
An error has occurred. See error log for more details.
com.vectrace.MercurialEclipse.history.GraphLogTableViewer cannot be cast to org.eclipse.ui.part.PageBookView$SelectionProvider
PerspectiveをJavaに切り替えた時などに発生していました。
同じ現象がこちらで現在進行中ですが
https://bitbucket.org/mercurialeclipse/main/issue/320/exception-on-history-when-using-eclipse
MercurialEclipse 2.0.1.v201210021536
というバージョンに問題があるようです。
ところがこのバージョン、公式のリポジトリにはなく、調べてみたら、以下のリポジトリを有効にしていると入るようです。
http://cbes.javaforge.com/update
Window→Preferences→Install/Update→Available Software Sitesでこのリポジトリを除外して、公式
でアナウンスされている
http://mercurialeclipse.eclipselabs.org.codespot.com/hg.wiki/update_site/stable
を登録すれば解決でした。
MercurialEclipse 2.0.0.201208160020
がインストールされました。
もし、すでにv201210021536などの新しいバージョンが入ってしまっている場合はHelp→About Eclipse→Installation Details→Installation Historyから、古い日付を選択してMercurialEclipseをRevertしてください。
2012/05/03
Eclipseで開発をするときに、Arrows Z(ISW11F)がPCから認識しなくて困っていました。
PCからはFujitsu Mass storage USB Deviceと認識されてしまう場合の対処法です。
まずはドライバダウンロードします。
http://spf.fmworld.net/oss/usb_driver/isw11f/index.html
解凍したらReadme.txtは必ず読んでください。
インストール前に確認するべき項目は次の通り。
それとPCでデバイスマネージャーを起動しておきましょう。
これでUSBで端末を接続して、問題なくFujitsu HSUSB Deviceという項目が出現すればいいのですが、出現せず、下の画像のようになる場合があります。
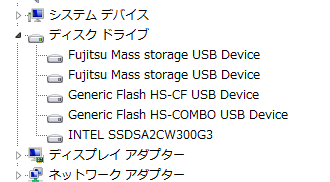
基本的には、すでに誤認識されてしまっているデバイスを削除してやればいいのですが、Fujitsu Mass storage USB Deviceの2行を削除しても、再接続すると元に戻ってしまいました。
なので、このデバイスの親ごと消す必要があります。作業は端末を接続したままで行います。
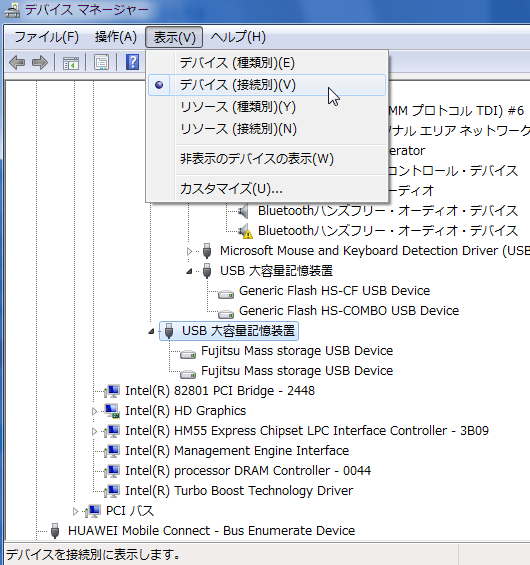
「ユニバーサル シリアル バス コントローラー」の下の「USB 大容量記憶装置」を右クリックして、削除します。ただし、複数デバイスがある場合は以下のように、デバイスマネージャーの表示を、「デバイス(接続別)」にしてやると、目的のデバイスがグループ化されるので、間違えずに消せるようになります。
消したあとは、一度端末を外して、再度USBで接続すると、自動的にドライバのインストールが始まります。
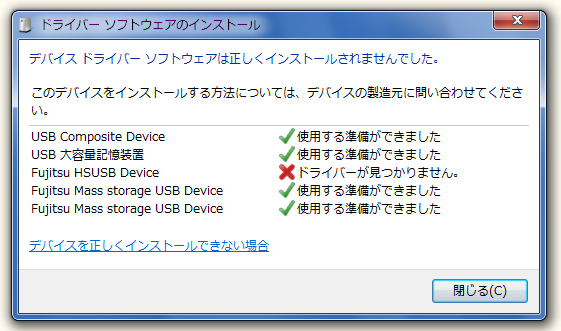
こうなれば成功です。ドライバーが見つかりませんと表示されますが、デバイス自体は認識されています。

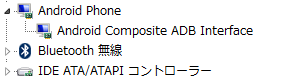
あとは、このFujitsu HSUSB Deviceを選択して、ドライバの更新をして、先ほどダウンロードして解凍したドライバファイルを選択すればAndroid Composite ADB Interfaceとして認識されます。
ちなみにMass storage USB Deviceを直接「ドライバーの更新」すれば良いという情報があったのですが、試そうとしたら64bitドライバがない旨のメッセージが出て、進めませんでした。
今回はこちらのサイトが参考になりました。
2012/03/05
[2012-03-05 08:32:06 - Test] Dx
trouble processing "javax/net/SocketFactory.class":

Ill-advised or mistaken usage of a core class (java.* or javax.*)
when not building a core library.

This is often due to inadvertently including a core library file
in your application's project, when using an IDE (such as
Eclipse). If you are sure you're not intentionally defining a
core class, then this is the most likely explanation of what's
going on.

However, you might actually be trying to define a class in a core
namespace, the source of which you may have taken, for example,
from a non-Android virtual machine project. This will most
assuredly not work. At a minimum, it jeopardizes the
compatibility of your app with future versions of the platform.
It is also often of questionable legality.

If you really intend to build a core library -- which is only
appropriate as part of creating a full virtual machine
distribution, as opposed to compiling an application -- then use
the "--core-library" option to suppress this error message.

If you go ahead and use "--core-library" but are in fact
building an application, then be forewarned that your application
will still fail to build or run, at some point. Please be
prepared for angry customers who find, for example, that your
application ceases to function once they upgrade their operating
system. You will be to blame for this problem.

If you are legitimately using some code that happens to be in a
core package, then the easiest safe alternative you have is to
repackage that code. That is, move the classes in question into
your own package namespace. This means that they will never be in
conflict with core system classes. JarJar is a tool that may help
you in this endeavor. If you find that you cannot do this, then
that is an indication that the path you are on will ultimately
lead to pain, suffering, grief, and lamentation.

[2012-03-05 08:32:06 - Test] Dx 1 error; aborting
[2012-03-05 08:32:06 - Test] Conversion to Dalvik format failed with error 1
Package Explorerからプロジェクトを右クリックして、Properties選択。
Java Build Path→Librariesを開いて、表示されているライブラリを全部Remove。
OKでウィンドウを閉じて、再度Package Explorerを右クリックして、Android ToolsからFix Project Propertiesを選択。
解決。
2011/10/18
EclipseでAndroidの開発をしていて、上記ダイアログが出て唐突にデバッグで起動できなくなったら、慌てずにそのF11を押す手を離して、パッケージマネージャのプロジェクトを選択して、Debug As Android Applicationだ。
OK?
2011/10/09
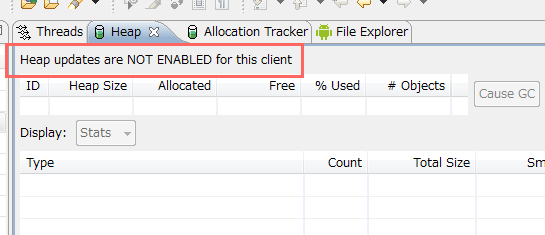
How to enable Heap updates on my android client – Stack Overflow
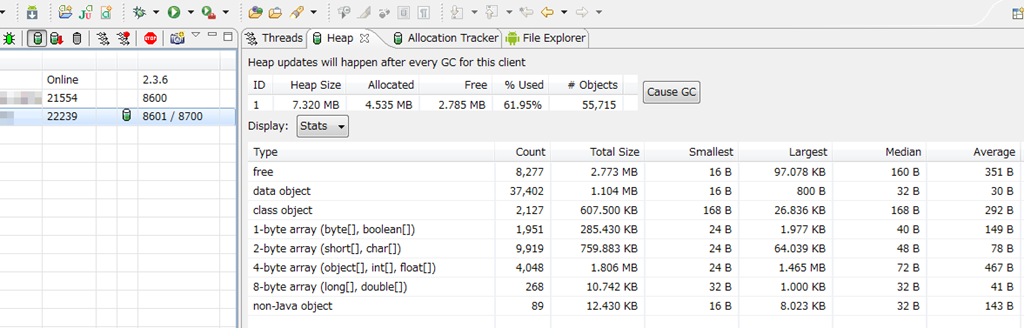
EclipseのDDMSでAndroid実機端末のヒープを見る方法のメモ。
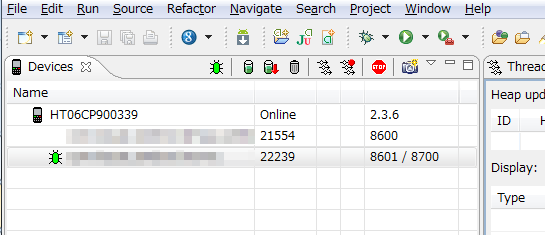
デバイスビューの緑の筒みたいなアイコンをクリックします。
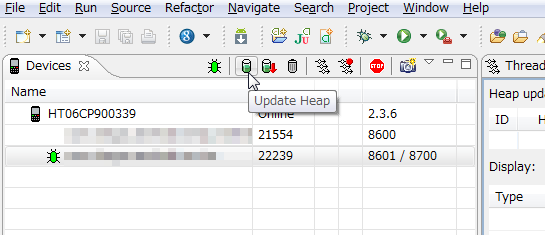
これでヒープが見られるようになります。
2011/09/03
Eclipse 3.7(Indigo)で、m2eをインストールしてTwitter4jをインポートしたあと、pom.xmlで
CoreException: Could not calculate build plan: Plugin org.apache.maven.plugins:maven-resource-plugin:2.4.3
というエラーが表示されてビルドできないという現象がありました。
m2eの再インストールとか色々試したのですが、以下の情報で解決できました。
De GIS, Programación y Otros Demonios: Maven Error: Could not calculate build plan
Windowsのユーザーフォルダにある.m2\repositoryフォルダの中から、「.lastUpdated」という拡張子がついたファイルを検索します。
ファイルが見つかったら、それを削除します。
Eclipseのプロジェクトエクスプローラー上から、プロジェクトを選択して、右クリック、Maven→Update Project Configuration…を選択、プロジェクトを選択してOKを押すだけです。
2011/09/02
環境はWindows7+Eclipse 3.7(Indigo)。
以前、m2eclipseと呼ばれていたプロジェクトは正式にEclipseのプロジェクトに取り込まれて、今はm2eとしてEclipseのレポジトリからインストールできます。
Webで検索すると、sonatypeのサイトにリンクしている、情報が古いエントリが多く出てくるので注意。
メニューのHelp→Install New Software…で、Work withに「Indigo – http://download.eclipse.org/releases/indigo」を選択。
「type filter text」の欄に「maven」と入力すれば「m2e」が表示されます。「m2e – Maven Integration for Eclipse 1.0.0.20110607-2117」にチェックを入れて、先に進めばインストールできます。
実際にMavenのプロジェクトを取り込むときは、メニューのFile→Import→Maven→Existing Maven Projectsを選択して、「Root Directory」の欄にpom.xmlのあるディレクトリを指定すればProjectsのリストが表示されます。
 HOMMA Teppei
東京都新宿区。
プログラマ兼、株式会社プレイスマート代表取締役社長。
主にAndroidアプリ関連の開発をしてます。

