EclipseでAndroidの開発をしていて、上記ダイアログが出て唐突にデバッグで起動できなくなったら、慌てずにそのF11を押す手を離して、パッケージマネージャのプロジェクトを選択して、Debug As Android Applicationだ。
OK?
2011/10/18
EclipseでAndroidの開発をしていて、上記ダイアログが出て唐突にデバッグで起動できなくなったら、慌てずにそのF11を押す手を離して、パッケージマネージャのプロジェクトを選択して、Debug As Android Applicationだ。
OK?
2011/10/11
問題というほどでもなかった。Androidのライブ壁紙作成のお話。
ライブ壁紙をステップ実行してデバッグするためにwaitForDebuggerを書いたのはいいのだけど、それを忘れてデバッグ用じゃない端末にインストールすると、一向にライブ壁紙を選択した後の「ライブ壁紙を読み込み中…」から進まない。
開発用端末でUSBケーブルを繋いでいると先に進めてしまうので、isDebuggerConnectedメソッドで分岐するようにしました。
public class MyWallpaperService extends WallpaperService {

	private final Handler handler = new Handler();

	@Override
	public Engine onCreateEngine() {
		if (android.os.Debug.isDebuggerConnected() // ここでデバッガが繋がっているか判定
				&& MyApplication.isDebuggable()) { // こっちはmanifestのdebuggableを読む実装
			android.os.Debug.waitForDebugger();    // デバッガ待機
		}
		return new MyEngine();
	}

	// do something ...

}
2011/10/11
いや、取れないわけじゃないですけどね。SensorManager.SENSOR_STATUS_UNRELIABLEにハマった…
XPERIA rayで方位が取れない問題があったので、調べていたところaccuracyのチェックでメソッドを抜けていたことが判明…完全に見落としてた。
	@Override
	public void onSensorChanged(SensorEvent event) {

		if (event.accuracy == SensorManager.SENSOR_STATUS_UNRELIABLE) {
			return;
		}

		switch (event.sensor.getType()) {
		case Sensor.TYPE_MAGNETIC_FIELD:
			magneticValues = event.values.clone(); // ■ここに来ない
			break;
		case Sensor.TYPE_ACCELEROMETER:
			accelerometerValues = event.values.clone();
			break;
		}

		// do something ...

	}
GALAXY Sでも方向が取れないと報告があったので多分これでしょう。
キャリブレーションすればいいのかな…
2011/10/09
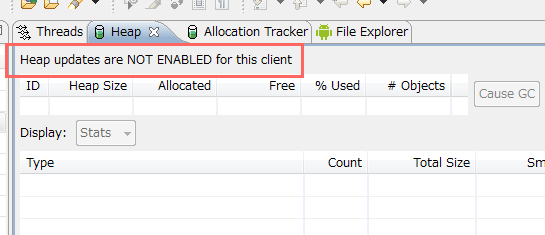
How to enable Heap updates on my android client – Stack Overflow
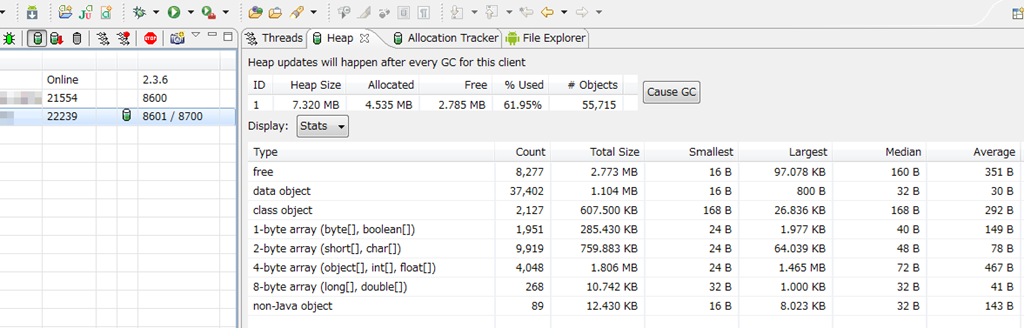
EclipseのDDMSでAndroid実機端末のヒープを見る方法のメモ。
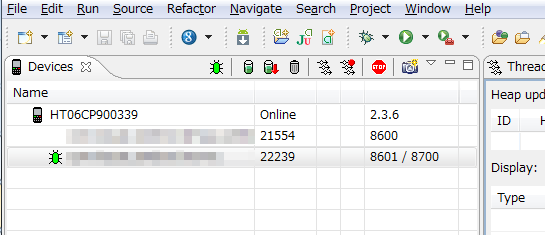
デバイスビューの緑の筒みたいなアイコンをクリックします。
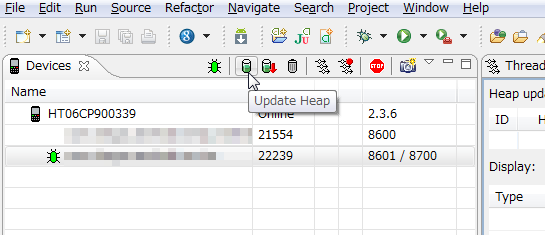
これでヒープが見られるようになります。
2011/07/09
Androidにて、ActivityからFacebookにギャラリーの画像をシェアする際に、画像の説明であるキャプションを指定する方法がわからなかったので調べました。
結論としてはIntent.EXTRA_TITLEを指定すれば良いようです。
TwitterやメールではIntent.EXTRA_TEXTとかなので、そのままだとFacebookアプリには反映されません。
String text = "Some caption...";
Uri path = Uri.parse("content://media/external/images/media/1"); // Gallery's URI etc.

Intent intent = new Intent(Intent.ACTION_SEND);

// キャプション
intent.putExtra(Intent.EXTRA_TITLE, text);

// 添付ファイル
intent.setType("image/jpeg");
intent.putExtra(Intent.EXTRA_STREAM, path);

intent.setFlags(Intent.FLAG_ACTIVITY_NEW_TASK);
startActivity(Intent.createChooser(intent, getString(R.string.post_facebook)));
追記 2012/09/20
Facebookのプラットフォームにより、Intentでテキストを追加することができなくなったそうです。
Bug – Android Intent Sharing is Broken – Facebook開発者
2011/06/16
アプリの一覧からアイコンを押したら、ライブ壁紙をプレビュー→壁紙に設定できる状態にできないかという話題。
ちなみに結論としてはパーミッション不足により失敗です。
ライブ壁紙の選択画面を表示させることはできるので、
Live Wallpaper – Binding an Activity to the ‘Open’ button of the market
こちらを参考にライブ壁紙選択画面の上にカスタムビューなどを表示させて誘導させるのが次善の策かと思います。
ライブ壁紙選択画面を表示するだけなら
Intent intent = new Intent();
intent.setAction(WallpaperManager.ACTION_LIVE_WALLPAPER_CHOOSER);
startActivity(intent);
でOK。
以下は失敗の記録。
上で書いたライブ壁紙選択画面表示のコードは
LiveWallpaperをアプリから設定する方法を探ってみた|いろいろ備忘録
こちらの方法でも代替できます。
LiveWallpaperListActivityのソースコードを持ってきて追いかけてみることにしました。
LiveWallpaperListActivity.java
これを同じパッケージ内に設置して、layoutやdimen、color等を適当に用意してやることで、選択画面は同じ物を再現できます。
一応、用意したファイル
live_wallpaper_list.xml
<?xml version="1.0" encoding="utf-8"?>
<LinearLayout xmlns:android="http://schemas.android.com/apk/res/android" android:layout_width="fill_parent" android:layout_height="wrap_content" android:paddingLeft="6dip" android:paddingRight="6dip" android:paddingTop="6dip" android:paddingBottom="6dip" android:minHeight="?android:attr/listPreferredItemHeight">
<ListView android:id="@android:id/list" android:layout_width="fill_parent" android:layout_height="fill_parent" android:drawSelectorOnTop="false"/>
<TextView android:id="@android:id/empty" android:layout_width="fill_parent" android:layout_height="fill_parent" android:gravity="center" android:visibility="gone" android:text="@string/live_wallpaper_empty" android:textAppearance="?android:attr/textAppearanceMedium"/>
</LinearLayout>
live_wallpaper_entry.xml
<?xml version="1.0" encoding="utf-8"?>
<RelativeLayout xmlns:android="http://schemas.android.com/apk/res/android" android:layout_width="fill_parent" android:layout_height="wrap_content" android:paddingLeft="6dip" android:paddingRight="6dip" android:paddingTop="6dip" android:paddingBottom="6dip" android:minHeight="?android:attr/listPreferredItemHeight">
<ImageView android:id="@+id/thumbnail" android:layout_width="@dimen/live_wallpaper_thumbnail_width" android:layout_height="@dimen/live_wallpaper_thumbnail_width" android:layout_gravity="center_vertical" android:scaleType="centerCrop"/>
<LinearLayout android:layout_width="wrap_content" android:layout_height="wrap_content" android:layout_marginLeft="10dip" android:layout_marginRight="8dip" android:layout_centerVertical="true" android:layout_toRightOf="@id/thumbnail" android:orientation="vertical">
<TextView android:id="@+id/title_author" android:layout_width="fill_parent" android:layout_height="wrap_content" android:textAppearance="?android:attr/textAppearanceMedium" android:singleLine="true" android:ellipsize="marquee"/>
<TextView android:id="@+id/description" android:layout_width="fill_parent" android:layout_height="wrap_content" android:textAppearance="?android:attr/textAppearanceSmall" android:maxLines="3"/>
</LinearLayout>
</RelativeLayout>
color.xml
<?xml version="1.0" encoding="utf-8"?>
<resources>
    <color name="live_wallpaper_thumbnail_background">#000000</color>
    <color name="live_wallpaper_thumbnail_text_color">#ffffff</color>
</resources>
dimens.xml (値は適当にいれた)
<?xml version="1.0" encoding="utf-8"?>
<resources>
    <dimen name="live_wallpaper_thumbnail_width">50dp</dimen>
    <dimen name="live_wallpaper_thumbnail_height">50dp</dimen>
    <dimen name="live_wallpaper_thumbnail_text_size">50dp</dimen>
    <dimen name="live_wallpaper_thumbnail_text_offset">50dp</dimen>
</resources>
で、このままでは
LiveWallpaperPreview.showPreview(this , REQUEST_PREVIEW, intent, info);
の行がコンパイルできないのでshowPreviewメソッド(staticメソッド)だけを取り出してきてLiveWallpaperListActivityに
	static final String EXTRA_LIVE_WALLPAPER_INTENT = "android.live_wallpaper.intent";
	static final String EXTRA_LIVE_WALLPAPER_SETTINGS = "android.live_wallpaper.settings";
	static final String EXTRA_LIVE_WALLPAPER_PACKAGE = "android.live_wallpaper.package";

	public void onItemClick(AdapterView<?> parent, View view, int position,
			long id) {
		final Intent intent = mWallpaperIntents.get(position);
		final WallpaperInfo info = mWallpaperInfos.get(position);
		//LiveWallpaperPreview.showPreview(this, REQUEST_PREVIEW, intent, info);
		//Intent preview = new Intent(this, LiveWallpaperPreview.class);
		String clazz = "com.android.wallpaper.livepicker.LiveWallpaperPreview";
		Intent preview = new Intent(Intent.ACTION_MAIN);
		int idx = clazz.lastIndexOf('.');
		String pkg = clazz.substring(0, idx);
		preview.setClassName(pkg, clazz);
		preview.setFlags(Intent.FLAG_ACTIVITY_NEW_TASK);
		preview.putExtra(EXTRA_LIVE_WALLPAPER_INTENT, intent);
		preview.putExtra(EXTRA_LIVE_WALLPAPER_SETTINGS,
				info.getSettingsActivity());
		preview.putExtra(EXTRA_LIVE_WALLPAPER_PACKAGE, info.getPackageName());
		this.startActivityForResult(preview, REQUEST_PREVIEW);
	}
先程のサイトを参考に、こんな感じで書き換え。で、実行。
FATAL EXCEPTION: main
java.lang.SecurityException: Permission Denial: starting Intent { act=android.intent.action.MAIN flg=0x10000000 cmp=com.android.wallpaper.livepicker/.LiveWallpaperPreview (has extras) } from ProcessRecord{4073a338 8432:com.sample.android.TestCase/10077} (pid=8432, uid=10077) requires null
    at android.os.Parcel.readException(Parcel.java:1322)
    at android.os.Parcel.readException(Parcel.java:1276)
    at android.app.ActivityManagerProxy.startActivity(ActivityManagerNative.java:1351)
    at android.app.Instrumentation.execStartActivity(Instrumentation.java:1374)
    at android.app.Activity.startActivityForResult(Activity.java:2827)
    at com.sample.android.TestCase.LiveWallpaperListActivity.onItemClick(LiveWallpaperListActivity.java:201)
    at android.widget.AdapterView.performItemClick(AdapterView.java:284)
    at android.widget.ListView.performItemClick(ListView.java:3513)
    at android.widget.AbsListView$PerformClick.run(AbsListView.java:1812)
    at android.os.Handler.handleCallback(Handler.java:587)
    at android.os.Handler.dispatchMessage(Handler.java:92)
    at android.os.Looper.loop(Looper.java:130)
    at android.app.ActivityThread.main(ActivityThread.java:3683)
    at java.lang.reflect.Method.invokeNative(Native Method)
    at java.lang.reflect.Method.invoke(Method.java:507)
    at com.android.internal.os.ZygoteInit$MethodAndArgsCaller.run(ZygoteInit.java:839)
    at com.android.internal.os.ZygoteInit.main(ZygoteInit.java:597)
    at dalvik.system.NativeStart.main(Native Method)
とりあえずライブ壁紙の一覧とアイコンは取れるってことはわかりましたね…
2011/06/15
oauth.signpost.exception.OAuthCommunicationException: Communication with the service provider failed: https://api.twitter.com/oauth/request_token
Application TypeをBrowserにして、Callback URLをダミーでいいので入力したかい?入力しないとClientに変更されるよ。
Request token URL
https://api.twitter.com/oauth/request_tokenAccess token URL
https://api.twitter.com/oauth/access_tokenAuthorize URL
https://api.twitter.com/oauth/authorize
httpsになってるからちゃんとdev.twitter.comから新しいのコピペしようね。
っていう、自分への備忘録。Androidの話。
2011/01/04
Android開発時に、コード補完が死ぬほど遅い問題の解決方法をまとめておきます。
参考にしたのは以下。
つまりはソースコードをダウンロードして展開しておけばいいということですね。
2.2(froyo)の場合
http://android.git.kernel.org/?p=platform/frameworks/base.git;a=snapshot;h=froyo;sf=tgz
base-froyo-73e150c.tar.gz、107MBでダウンロードは10分ほどでした。
展開すると、pax_global_headerというファイルとbase-froyo-73e150cというディレクトリができるので、base-froyo-73e150cをsoucesに名前変更して、
android-sdk-windows\platforms\android-8
の下に移動して完了。
2.1(eclair)の場合はダウンロードURLのh=froyoをh=eclairに変更して、展開先をandroid-7\sourcesにすればOK。
展開すればEclipse再起動しなくても有効になります。
2010/10/11
今回の情報元。
How to install Sun JDK on Ubuntu 10.10 "Maverick meerkat"? – Stack Overflow
まずはaptラインの設定。
# vi /etc/apt/source.list
deb http://archive.canonical.com/ubuntu maverick partner
deb-src http://archive.canonical.com/ubuntu maverick partner
を追加。
# aptitude update
# aptitude install sun-java6-jdk
で、OK。
2010/08/29
Androidのアプリ開発をするときに、サーバとの通信を確認したいということはよくあります。
通信の確認にFiddlerを組み合わせて使うことで、XMLを整形された状態で見たり、詳細なHTTPヘッダを確認したり、リクエストを改ざんしたり、アプリプログラム側を変更せずに開発サーバを見に行くようにしたりできるようになります。自分のローカルマシンだけでサーバ・クライアントモデルの開発が完了できる環境を作っておくと楽ですね。
Fiddlerについてはこちら。
実はFiddlerがすごすぎたので、機能まとめ紹介 : blog.loadlimit – digital matter –
AndroidエミュレータのHTTP Proxy設定方法について参考にしたのはこちら。
[Android] エミュレーターのプロキシ設定(Using the Emulator with a Proxy) – adakoda
AndroidのブラウザでGoogleニュースを見たときのリクエストはこんな感じで覗けます。
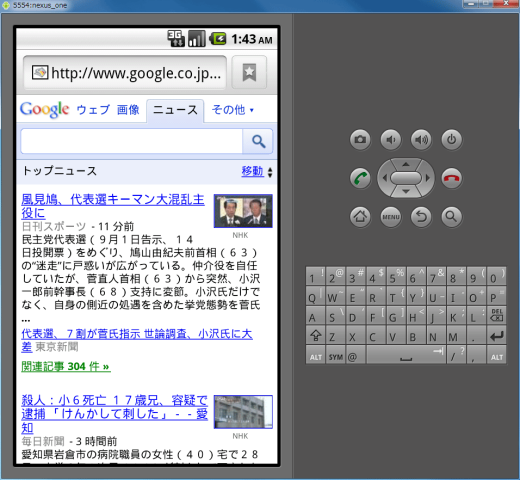
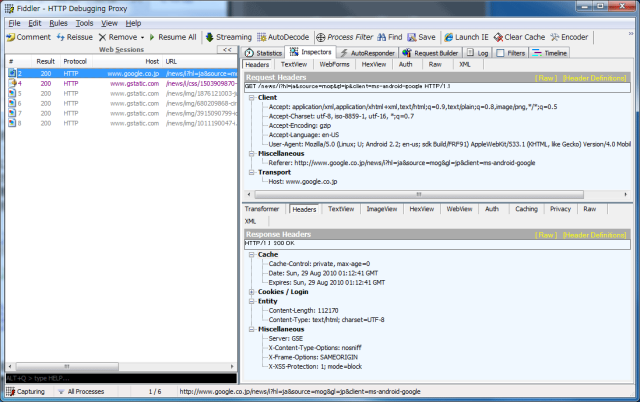
具体的なやり方は以下の通り。
あと、開発はEclipseで行っていると仮定しますが、別にエミュレータそのまま起動する場合でもOKです。
Fiddlerインストール
FillderのメニューからTools→Fiddler Optionsを選択 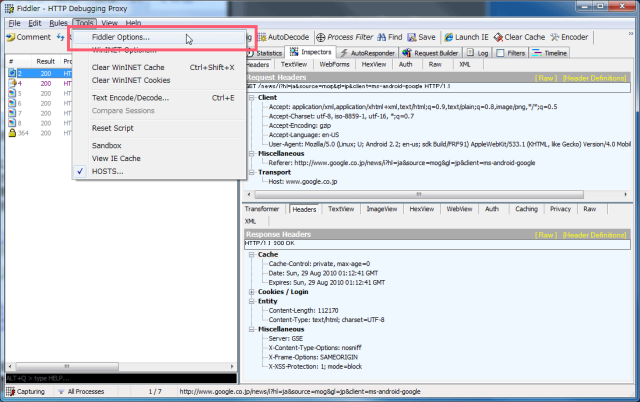
Connectionsタブから、Allow remote computers to connectを選択して、ローカルマシン以外からのアクセスを受け付ける 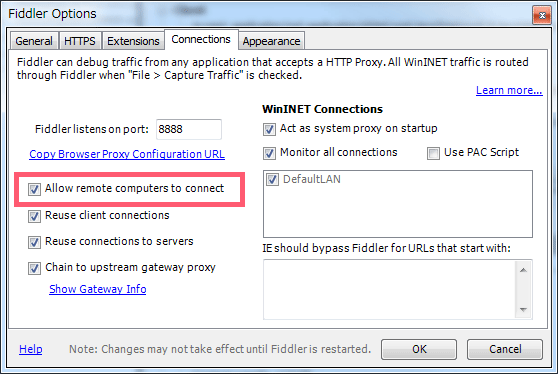
併せて、その上のFldder listens on portを覚えておく。ここでは8888を使用。
Fiddlerを一度終了して、起動する
EclipseのメニューのWindows→Preferencesを開いて、左側のツリーからAndroid→Launchを選択、Default emulator optionsに-http-proxy http://[ローカルマシンのIP]:[先ほど調べたFiddlerのポート]を入力。 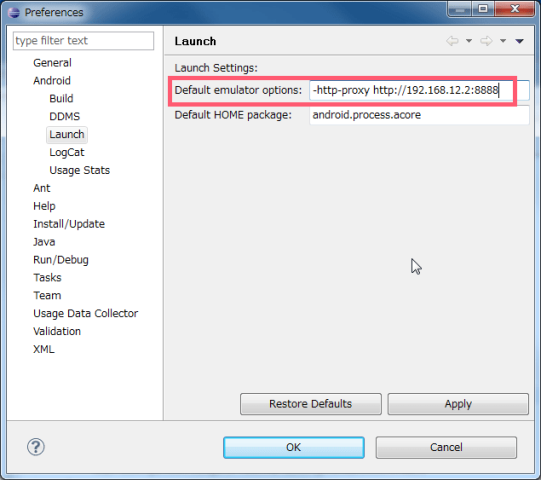
すでにプロジェクトを作ってしまっている場合には、メニューのRun→Run configurationsからAdditional Emulator Command Line Optionsを設定する。 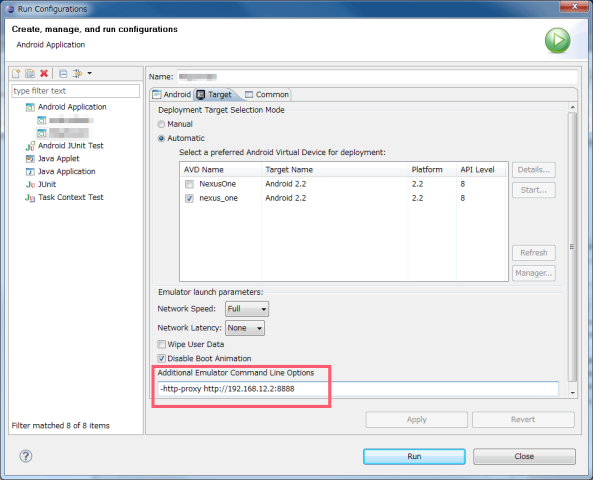
これで、ApplyしてRunすれば、ProxyにFiddlerを経由して開発することができるようになります。
あとは、必要に応じて、UserAgentにAndroidが含まれているかどうかなどをFiddlerのフィルタにセットすればOKです。
FiddlerのHOSTS機能でサーバのドメインを開発用のVirtualPCなどに割り当てれば、一台で完結できます。
FiddlerのメニューからTools→HOSTSを選択 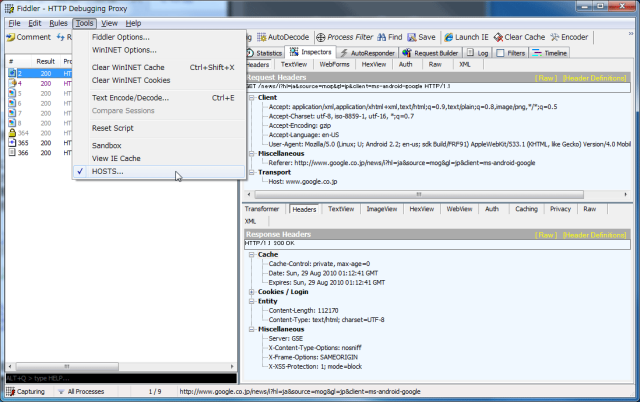
開発マシンのIPとドメインを設定してやればOKです。 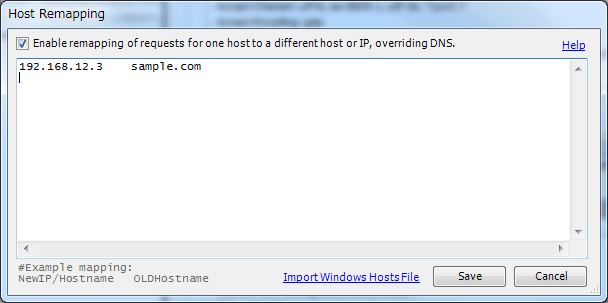
ただし、Androidのブラウザの場合、どうやら存在するドメインでないと、リクエストできないみたいです。おそらくHTTPリクエスト前にDNS名前解決を一度しているのではないかと思います。ドメイン存在していれば大丈夫なので、たいした問題ではないかと思います。
 HOMMA Teppei
東京都新宿区。
プログラマ兼、株式会社プレイスマート代表取締役社長。
主にAndroidアプリ関連の開発をしてます。

